[Docker] Install Gitlab Runner(v17.6.1)
[Docker] Install Gitlab Runner(v17.6.1)
GitLab Runner 설치
GitLab Runner 작업 Directory (Working directory)와 데이터를 영속적(Persistent)으로 저장하기 위한 바인드 마운트(Bind mount)용 Directory를 생성
1
sudo mkdir -p /data/gitlab-runner/config && cd /data/gitlab-runner
gitlab-runnerDirectory의 소유권을$USER로 변경하고 권한을 변경1
sudo chown -R $USER:$USER /data/gitlab-runner
docker-compose.yml 파일을 생성
1
2
3
4
5
6
7
8
9
version: '3.9'
services:
gitlab-runner:
    image: 'gitlab/gitlab-runner:v17.6.1'
    container_name: gitlab-runner
    restart: always
    volumes:
    - './config:/etc/gitlab-runner'
    - '/var/run/docker.sock:/var/run/docker.sock'
GitLab Runner 시작
docker-compose up -d명령을 실행하여 Runner를 시작
GitLab Runner 등록
- GitLab UI에는 액세스 할 사용자에 따라 세 가지 유형의 Runner가 있다.
- 공유 러너는 GitLab 인스턴스의 모든 그룹 및 프로젝트에서 사용할 수 있다. (Admin Area의 CI/CD > Runners)
- 그룹 러너는 그룹의 모든 프로젝트와 하위 그룹에서 사용할 수 있다. (그룹의 Settings > CI/CD > Runners 섹션)
- 특정 러너는 특정 프로젝트와 연결됩니다. 일반적으로 특정 러너는 하나의 프로젝트에서만 사용된다. (프로젝트의 Settings > CI/CD > Runners 섹션)
- 여기에서는 공유 러너(Shared runner) 를 등록하는 방법을 설명 (Admin 권한 필요)
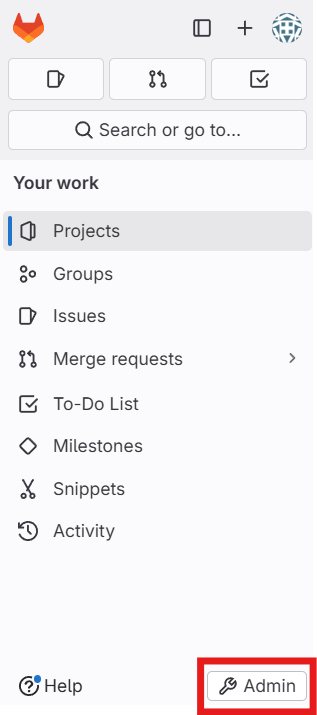
GitLab Admin Area 페이지로 이동한다.
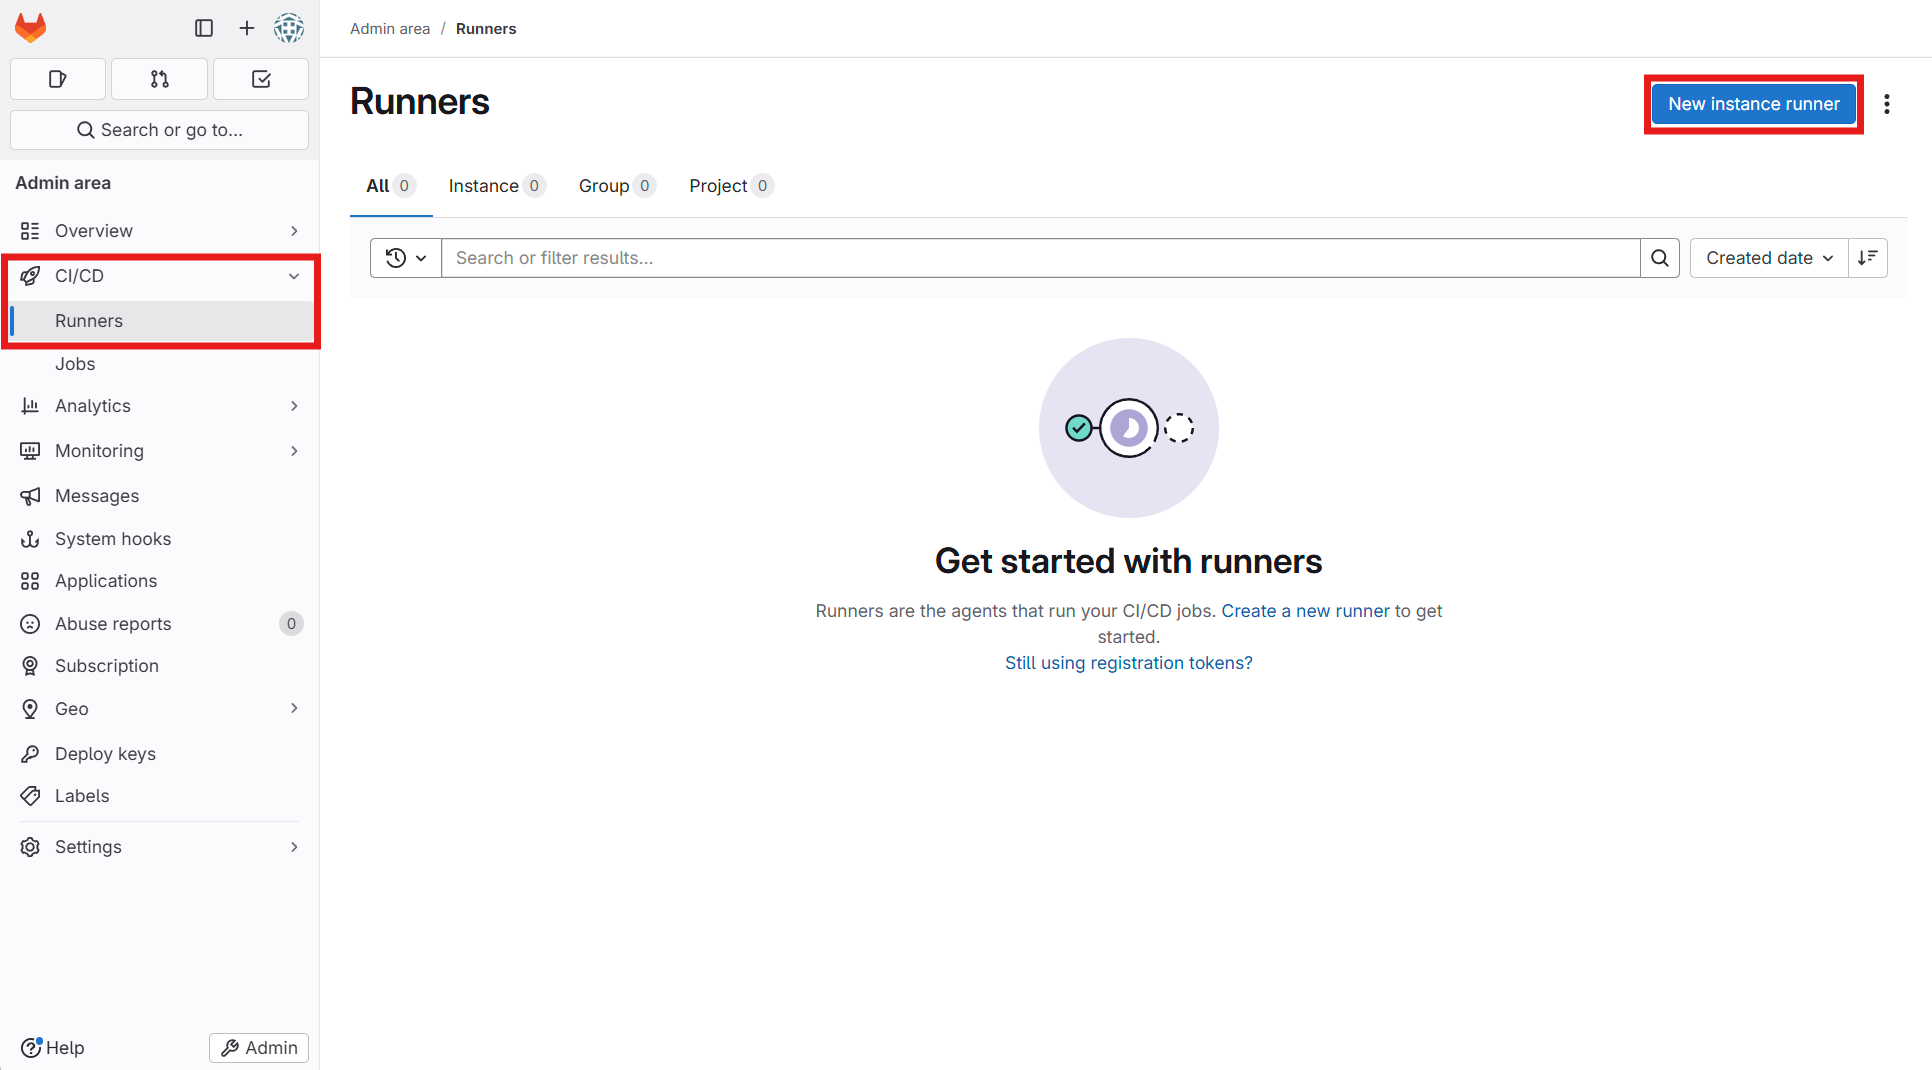
사이드 바에서 CI/CD > Runners를 클릭한다. 이후 New instance runner 를 클릭한다.
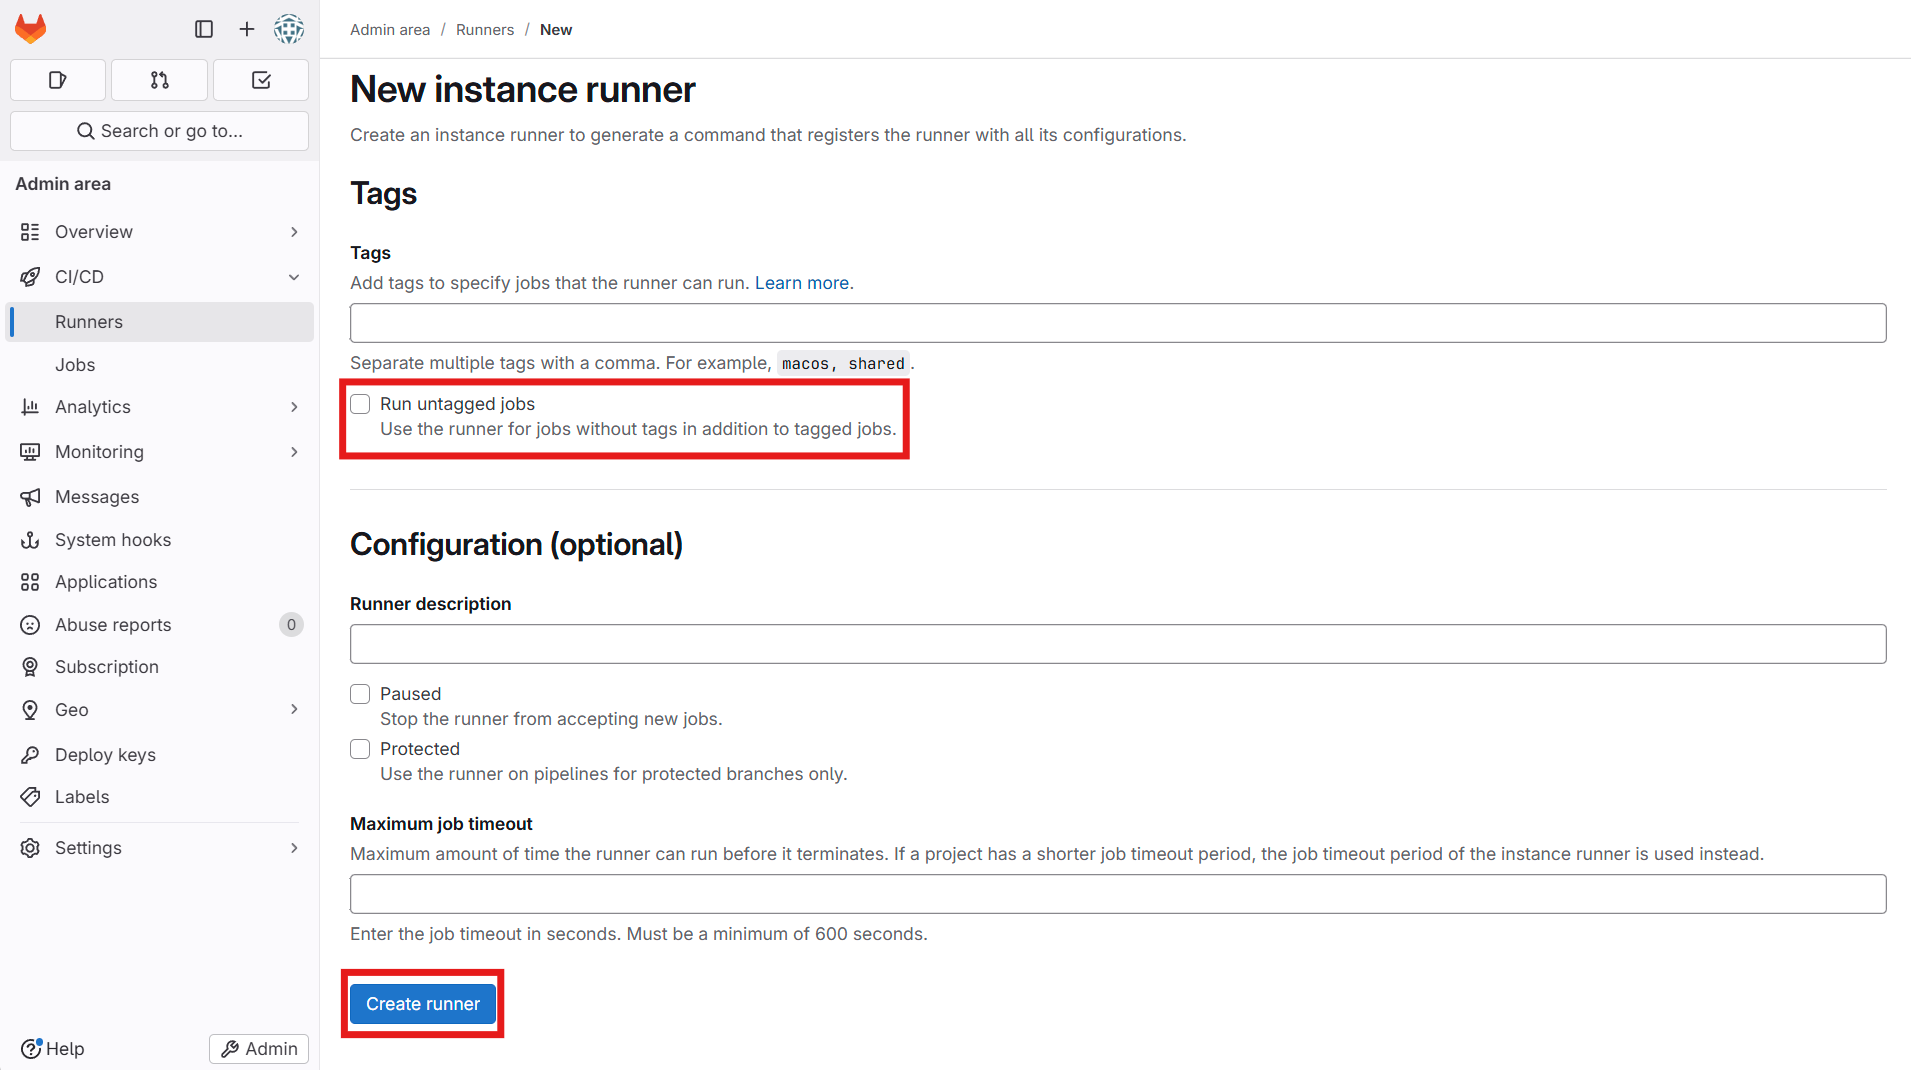
태그 없이 Runner을 사용하기 위해 Run untaged jobs 를 체크한다. 이후 Create runner 를 클릭하여 러너를 생성한다.
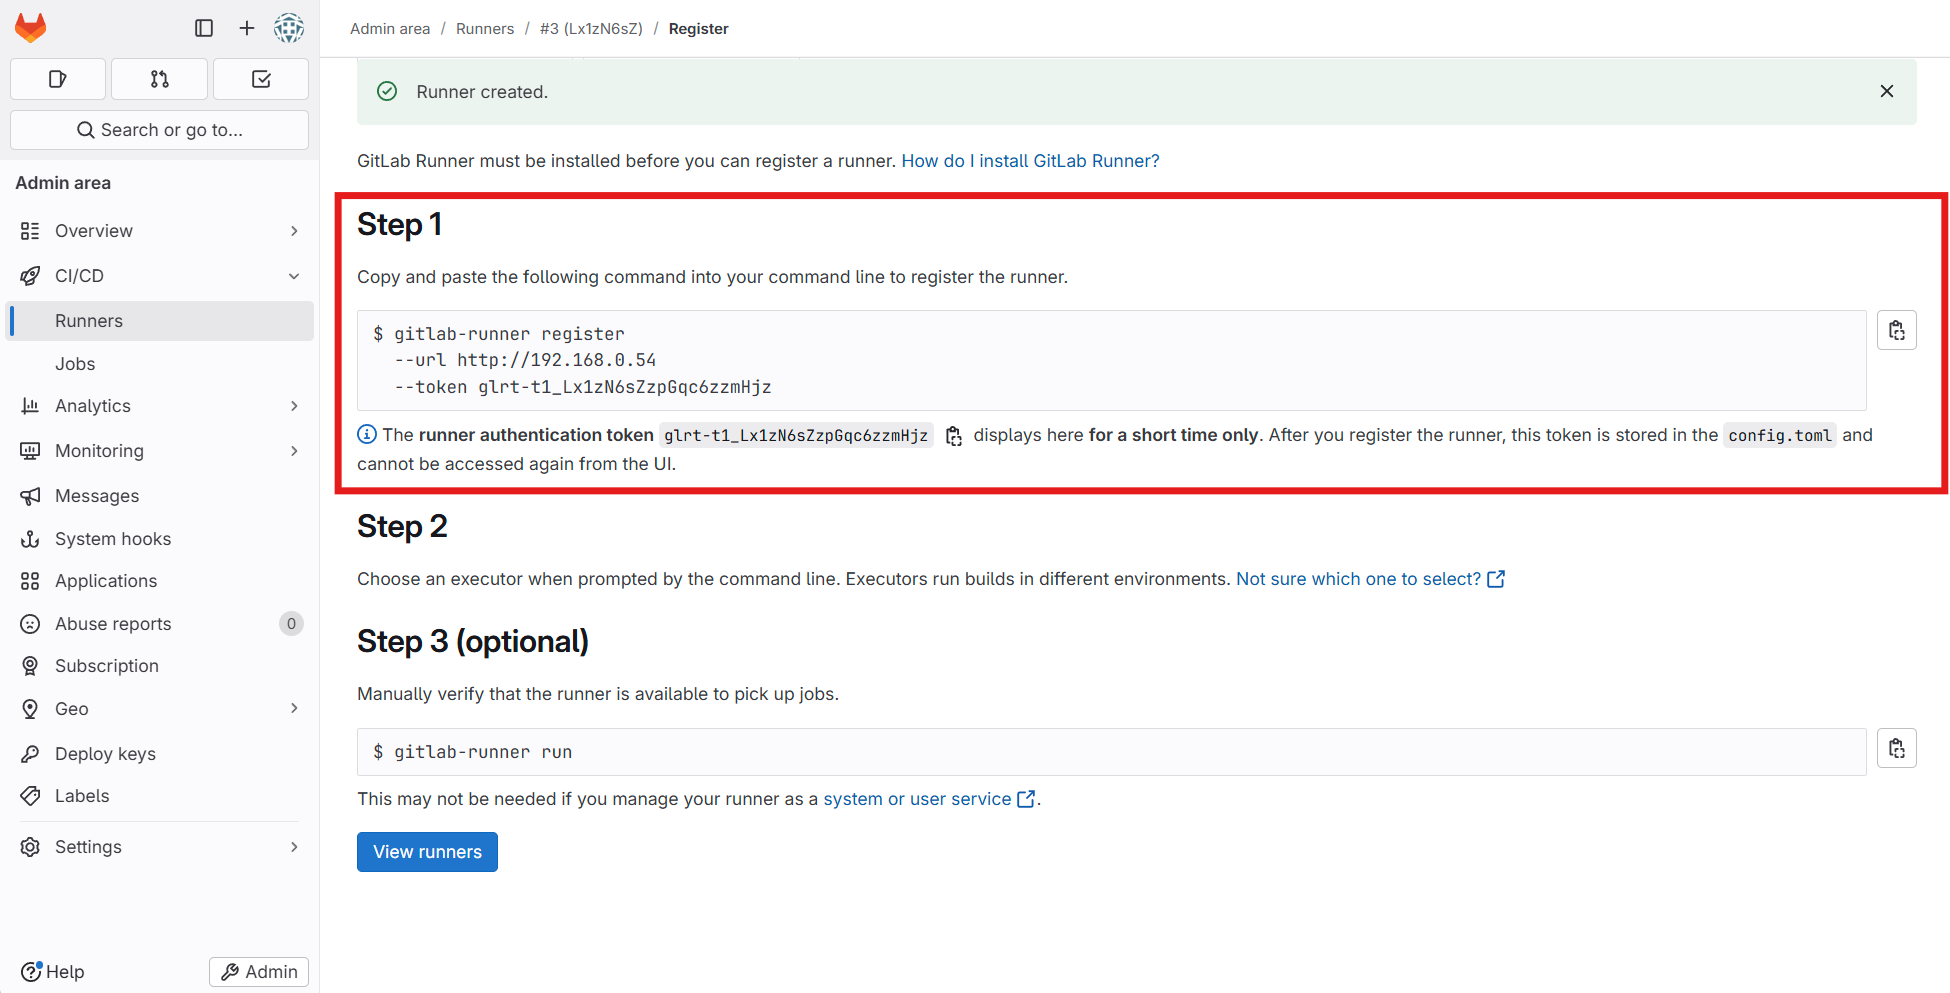
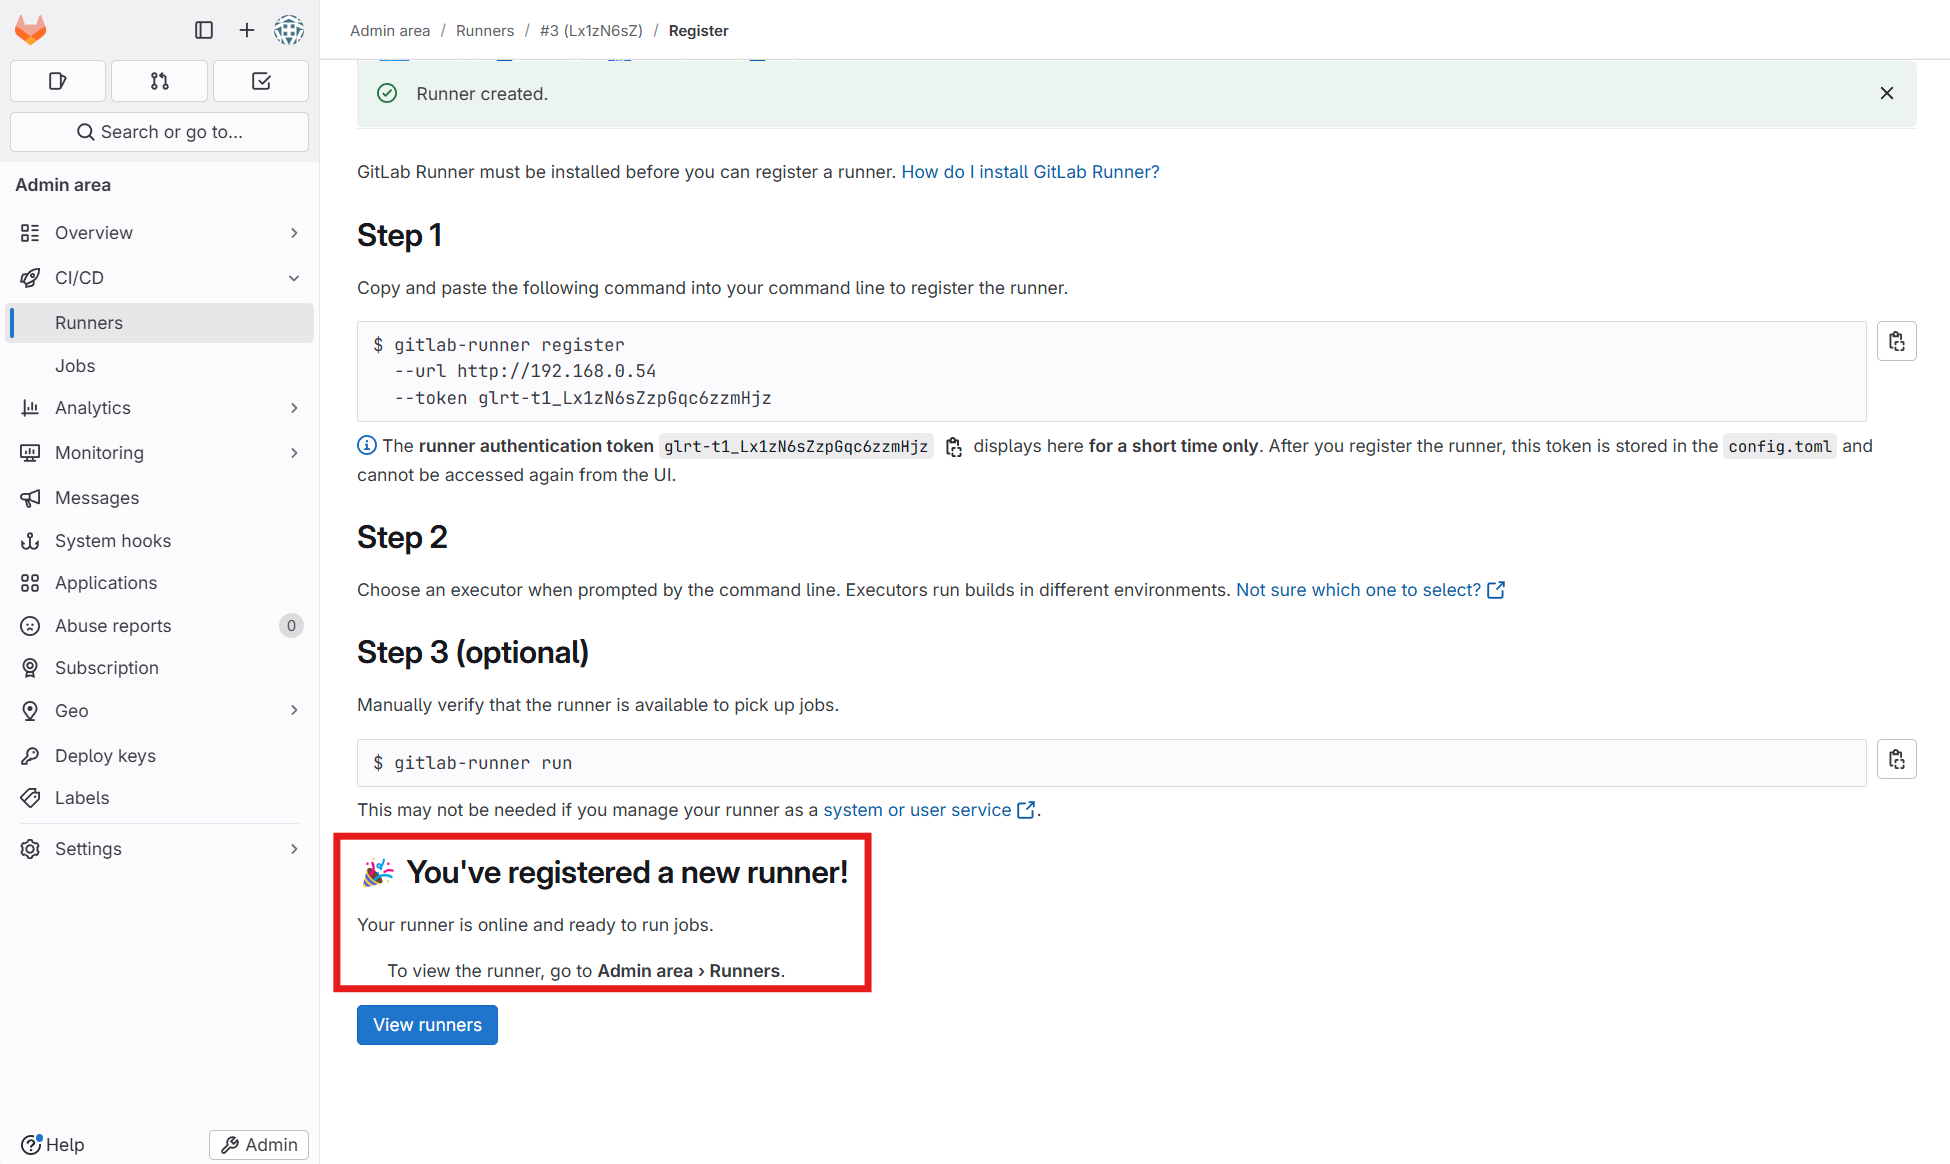
Step1 의 명령어를 복사한다.
1
gitlab-runner register  --url http://192.168.0.54  --token glrt-t1__YKDoWm-di4smDhcNoCX
gitlab-runner 컨네이너에 대화형(interactive) Bash Shell을 실행
1
docker exec -it gitlab-runner bash
- 프로젝트와 연동하는 방법은 두가지가 있다.
- 비대화식 모드(non-interactive mode)로 등록
- 대화식 모드(interactive mode)로 등록
비대화식 모드(non-interactive mode)
1
2
3
4
5
6
7
8
9
10
gitlab-runner register -n \
--url http://$IP \
--registration-token $TOKEN \
--description gitlab-runner \
--executor shell \
--tag-list deploy-1

...✂...

Runner registered successfully. Feel free to start it, but if it's running already the config should be automatically reloaded!
| Option | Description |
|---|---|
--url | GitLab 인스턴스 URL |
--registration-token | Project의 token |
--description | 설명 |
--executor | 빌드를 실행하는 데 사용할 수 있는 여러 실행 프로그램 |
--docker-image | Docker를 실행 프로그램으로 선택한 경우 사용할 이미지 |
--docker-volumes | Docker를 실행 프로그램으로 선택한 경우 사용할 볼륨 |
--tag-list | .gitlab-ci.yml 파일에서 작업할 runner를 지정할때 사용 |
대화식 모드(interactive mode)
gitlab-runner register ~명령을 실행하고 지침에 따라 아래 항목을 입력- Enter the GitLab instance URL : 아무것도 입력하지 않고 Enter 키를 누른다.
--url값이 설정된다. - Enter the registration token : 아무것도 입력하지 않고 Enter 키를 누른다.
--token값이 설정된다. - Enter a description for the runner : 러너에 대한 설명을 입력하고 Enter 키를 누른다. (예:
docker runner) - Enter tags for the runner : 아무것도 입력하지 않고 Enter 키를 누른다.
- Enter an executor :
docker을 입력하고 Enter 키를 누른다. - Enter the default Docker image :
alpine:latest을 입력하고 Enter 키를 누른다.
- Enter the GitLab instance URL : 아무것도 입력하지 않고 Enter 키를 누른다.
1
2
3
4
5
6
7
8
9
10
11
12
13
14
15
16
17
ubuntu@mp-repo:/data/gitlab-runner$ sudo docker exec -it gitlab-runner bash
root@183e583bf883:/# gitlab-runner register  --url http://192.168.0.54  --token glrt-t1_bkEhznhp1Qbdow6o44TK
Runtime platform                                    arch=amd64 os=linux pid=52 revision=6826a62f version=17.6.1
Running in system-mode.

Enter the GitLab instance URL (for example, https://gitlab.com/):
[http://192.168.0.54]:
Verifying runner... is valid                        runner=t1_bkEhzn
Enter a name for the runner. This is stored only in the local config.toml file:
[183e583bf883]: docker runner
Enter an executor: shell, docker-windows, docker+machine, kubernetes, docker-autoscaler, instance, custom, ssh, parallels, virtualbox, docker:
docker
Enter the default Docker image (for example, ruby:2.7):
alpine:latest
Runner registered successfully. Feel free to start it, but if it's running already the config should be automatically reloaded!

Configuration (with the authentication token) was saved in "/etc/gitlab-runner/config.toml"
- 정상적으로 등록이 완료되면 You’ve created a new runner! 문구가 나타난다.
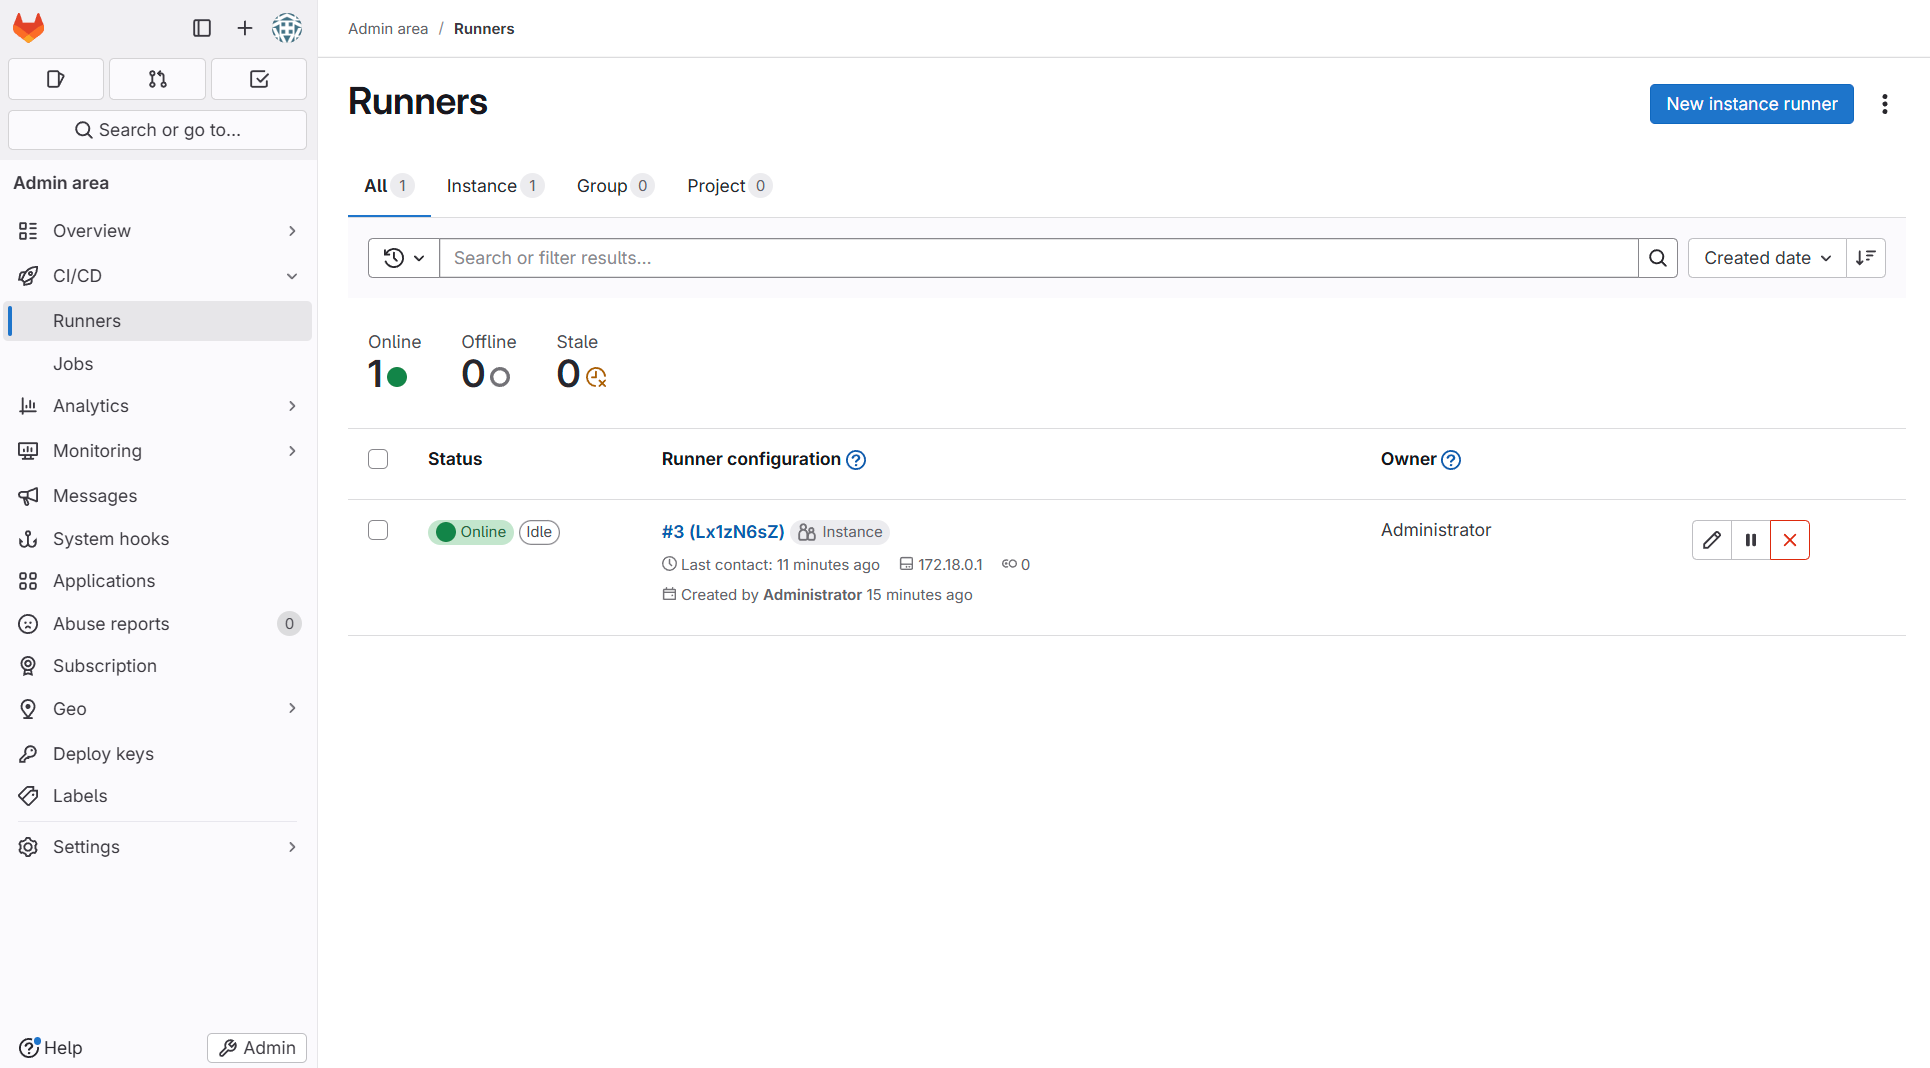
CI/CD > Runners 페이지에서 GitLab UI를 새로고침하면 등록된 러너가 목록에 나타난다.
GitLab Runner 구성
- GitLab Runner 및 등록된 개별 Runner의 동작을 변경할 수 있다.
- GitLab Runner의 구성을 변경하려면
config.toml파일을 수정해야 한다. - 대부분의 옵션을 변경할 때 GitLab Runner를 다시 시작할 필요가 없다. 여기에는
listen_address를 제외한[[runners]]섹션의 파라미터와 글로벌 섹션의 대부분의 파라미터가 포함된다. - GitLab Runner는 3 초마다 구성 수정사항을 확인하고 필요한 경우 다시 로드한다.
Job 동시성(concurrency) 설정
- GitLab Runner가 동시에 여러 Job을 실행할 수 있도록 적절하게
concurrent을 수정한다. - 예를 들어, 4vCPU/16GiB인 경우
concurrent = 4로 설정한다. - GitLab.com의 자동 확장(Auto-scaling) Shared Runner는 단일 작업이 1 vCPU와 3.75GiB를 사용하여 단일 인스턴스에서 실행되도록 구성된다.
Docker 특권(privileged) 모드 설정
- 아래 CI 파이프라인(.gitlab-ci.yml)과 같이, Docker-in-Docker 컨테이너를 사용하여 docker build와 같은 스크립트를 실행하기 위해서는 특권 모드(privileged mode) 설정이 필요하다.
1
2
3
4
5
6
7
8
image: docker:git
services:
- docker:dind

build:
  script:
  - docker build -t my-image .
  - docker push my-image
위에서 언급한 Runner 옵션을 수정하려면 Runner 작업 Directory(예:
/data/gitlab-runner)에서 아래 명령을 실행하고 수정한다. 또는 gitlab-runner bash에 접속하여/etc/gitlab-runner에서config.toml를 수정하여도 된다.1
sudo vi config/config.toml[runners.docker]에서privileged = true로 설정한다.1 2 3 4 5 6 7 8 9 10 11 12 13 14 15 16 17 18 19 20
...✂... concurrent = 2 check_interval = 0 connection_max_age = "15m0s" shutdown_timeout = 0 [session_server] session_timeout = 1800 [[runners]] ...✂... [runners.docker] tls_verify = false image = "alpine:latest" privileged = true ...✂...gitlab-runner restart
1
sudo docker restart [gitlab-runner 컨테이너 id]
gitlab ci yml 구성
1
2
3
4
5
6
7
8
9
10
11
12
13
14
15
16
17
18
19
20
21
22
23
24
25
26
27
28
29
30
31
32
33
34
35
36
37
38
39
40
41
42
43
44
45
46
47
48
49
50
51
52
53
54
55
56
57
58
59
60
61
62
63
variables:
  AWS_ACCOUNT_ID: [AWS 계정 아이디]
  DOCKER_REGISTRY: dkr.ecr.$AWS_DEFAULT_REGION.amazonaws.com
  CPU: 1024
  MEMORY: 2048
  DOCKER_HOST: tcp://localhost:2375
  DOCKER_DRIVER: overlay2
  DOCKER_TLS_CERTDIR: ''

build_prod:
  stage: build
  image:
    name: docker:stable
  services:
    - name: docker:20-dind
      alias: localhost
      command: ['--tls=false']
  variables:
    ECR_REPOSITORIES: [레포지토리명]
  before_script:
    - apk add --no-cache curl python3 py3-pip
    - pip install awscli botocore==1.29.21
    - aws s3 cp $AWS_S3_BUCKET_URI/$APP_NAME ./ --recursive --exclude="*.development" --exclude="prisma/*"
    - aws s3 cp $AWS_S3_BUCKET_URI/$APP_NAME/prisma/production/.env ./prisma/.env
    - aws ecr get-login-password --region $AWS_DEFAULT_REGION | docker login --username AWS --password-stdin $AWS_ACCOUNT_ID.$DOCKER_REGISTRY
    - export DOCKER_HOST=tcp://localhost:2375
    - aws --version
    - docker info
    - docker --version
  script:
    - echo "Building image..."
    - docker build -f Dockerfile.prod -t $ECR_REPOSITORIES:$CI_COMMIT_SHORT_SHA .
    - echo "Tagging image..."
    - docker tag $ECR_REPOSITORIES:$CI_COMMIT_SHORT_SHA $AWS_ACCOUNT_ID.$DOCKER_REGISTRY/$ECR_REPOSITORIES:latest
    - echo "Pushing image..."
    - docker push $AWS_ACCOUNT_ID.$DOCKER_REGISTRY/$ECR_REPOSITORIES:latest
  only:
    - production

deploy_prod:
  stage: deploy
  image:
    name: docker:stable
  services:
    - name: docker:20-dind
      alias: localhost
      command: ['--tls=false']
  variables:
    ECR_REPOSITORIES: [레포지토리명]
    TASK_DEFINITION_NAME: [테스크명]
    CLUSTER_NAME: [클러스터명]
    SERVICE_NAME: [서비스명]
  needs: [build_prod]
  before_script:
    - apk add --no-cache curl jq python3 py3-pip
    - pip install awscli botocore==1.29.21
    - aws ecr get-login-password --region $AWS_DEFAULT_REGION | docker login --username AWS --password-stdin $AWS_ACCOUNT_ID.$DOCKER_REGISTRY
  script:
    - echo $DOCKER_REGISTRY/$APP_NAME:latest
    - echo "Updating the service..."
    - aws ecs update-service --region "$AWS_DEFAULT_REGION" --cluster "$CLUSTER_NAME" --service "$SERVICE_NAME" --task-definition "$TASK_DEFINITION_NAME" --force-new-deployment
  only:
    - production
This post is licensed under CC BY 4.0 by the author.
